Showing posts with label How_to_do. Show all posts

Monday

How to adjust your PC's screen brightness | Manually and Automatically | Step-by-step free guide.


⇲  Benefits of decreasing screen brightness:
Most users need to adjust the screen brightness of their Pc or tablet. Decreasing your screen brightness help to save your power and increase your Monitor's battery life because it lowers internal heat and temperature. Also too much bright screen causes eyestrain. 
See also: How to Take Screenshot In Window/Mac Laptop
⇲  How to adjust your PC's screen brightness?
 Adjust Brightness with laptop keys
Mostly in laptops there are special keys on the keyboard which are marked with the brightness symbol 🔆. These brightness keys are mostly located at the top of your keyboard with function keys and often perform function with Fn key or Up and Down arrow keys.


 Adjust Brightness in Windows 10 Settings
➧   On Windows 10 click the battery icon in the notification area and click the brightness tile that appears. 
➧    Alternatevey go to Start➝ Settings  “System”  “Display.”  in “Adjust brightness level” drag slider to change the brightness level.
 Adjust Brightness in Windows 7,8 or 8.1
➧   If you’re using Windows 7 or 8,Go in StartControl Panel  “Hardware and Sound,” “Power Options.” 
➧   In windows 8.1 Settings Control Panel Power Options. Here you can customize your power plan. There are two plan options 
1.   Balanced (Automatically balance performance with energy)
2.   Power saver (Save energy by reducing PC's performance)
➧   You can configure different screen brightness levels for different power plans and switch between them. Choose best plan for your windows. 
See also: How To Turn Off Laptop Screen Manually
➧   You can also fix Brightness with “Screen brightness” slider at the bottom of the Power Plans window Or your selected plan's settings.
 Adjust brightness in Windows Mobility Center
Open Windows Mobility Center by right-clicking the Start Menu icon, or by typing Win+X Click Mobility Center . In the Windows Mobility Center, adjust the brightness slider. You can also chnage your power plan.


Adjusting brightness in OSX
➧   GO To Apple Menu System Preferences Click Displays.
➧   Use the brightness slider to adjust brightness. If you want your brightness to change automatically check the box marked Automatically adjust brightness.

➤➤  That’s all for How to Adjust Your PC's Screen Brightness. Do try the above tips and Methods also share your experience with us in comment section. Please let us know what works for you and what not —so that other readers can also benefit from your experience..."Share this article with your friends and Subscribe my blog for more hacks…
See Also >>> How To Fix Windows Time

Thursday

How to factory reset Window laptop | 5 ways to refresh, reset, or restore your PC | Step-by step guide.


If you're getting strange error message on your PC or your windows in not working properly and any other method doesn't work for you then last option is reinstall the windows and return your PC to its default state.. Here's our guide to factory resetting a PC, laptop, or tablet running Windows 10, 8, 8.1 or 7.
See also: How To Activate Windows
🔶    Method 1:
      Click on the Settings icon in the menu, then select Update & recovery. Alternatively, type Reset into the search tab. 
      From the Update & recovery menu, select Recovery. This will bring up three options: Refresh your PC, Reinstall windows and Advanced start-up. 
➜     If you select first option it will refresh your pc without affecting your files, photos and music. but all installed apps will removed from your pc.
➜     For restoring your laptop, you’ll select second option reinstall windows it will remove everything so backup your files before proceeding to this option.
       While the third option will reinstalls the original version of Windows that came on your laptop. It may be worth noting which version of Windows your laptop came with and also all your files will be deleted. For a full reset, choose this option.
       If you have multiple drives on your machine, you’ll need to decide whether to remove the files from all drives, or just the drive where Windows is installed. 
      You’ll then be given the option to clean your drives as well as remove files.
      Finally, you’ll be given a breakdown of what will happen to your laptop if you restore it to factory settings. If you’re happy with this, you can click Restore and the process will begin.


🔶    Method 2:
     First, hit the Start button and then type "Remove". If you’re running Windows 8.1, you should see the option to Remove everything and reinstall Windows. 
➜     Those still on Windows 8 will need to click the Settings option on the right-hand side first, then select the Reinstall option.OR  press WIN+C to bring up the Charms menu, click Settings > Change PC Settings. Next, click on the General section in the vertical bar on the left-hand side of the screen. This Remove everything and reinstall Windows option will appear on the right-hand side of the screen. Click Get Started to kick off the process.  
      If you have multiple hard disks in your computer, you have option to wipe All the drives or Only the drive where Windows is installed. With a laptop, pick this latter option.
     Next, you’ll be asked if you want to Just remove files or Clean the drive fully. If you want to refresh  choose the first option. If you’re handing over your old laptop to someone else or selling it, select the second option. it will completely remove your data, so whoever ends up with the machine can’t retrieve any files using recovery software.
       You’ll now see another warning page, giving you the chance to cancel or continue also This process won't let you start the reset without plugging the laptop into the mains, so plug it in and switch on before you go any further. 
🔶    Method 3:
        Backup any data which you wish to keep before performing a factory reset. 
        you can boot your pc from cd/dvd or usb. 
HERE know How to Boot PC From CD/DVD & USB
        During the start-up process, hit the appropriate F key or key combination which we have listed below select the key according to your pc.
Acer – Alt + F10
Asus – F9
Dell/Alienware – F8
HP – F11
Lenovo – F11
MSI – F3
Samsung – F4
Sony – F10
Toshiba – 0 (not numpad) while turning on, release key when Toshiba logo appears.
If these keys don't work then look out for a message in the screen during startup which might indicate how to start the recovery process. You might need to check your recovery partition is enabled in the BIOS. 
➜          Different manufacturers use different software to restore the 'disk image' from the recovery partition. However, the process is almost always automatic once you've confirmed you definitely want to proceed.
➜          Power up your PC and tap [F8] until a menu titled Advanced Boot Options appears. Select  'Repair your computer' link at the top of the list and press the [Enter] key. You may find your computer's recovery software starts up straight away. If not, continue through a language and keyboard preferences screen to the point where you're required to select your usual Windows username and enter the corresponding password if necessary.
You'll now be met with a menu titled System Recovery Options. The last link is usually the one to activate the computer manufacturer's recovery software.
On a Dell machine it's likely to be labelled Dell DataSafe Restore, HP call its software Recovery Manager, and Sony's version comes under the heading VAIO Recovery Center.
See also: How to Take Screenshot In Window/Mac Laptop
🔶    Method 4:
If your computer didn’t come with any recovery data at all, then you’ll have to reset your computer the old fashioned way: by installing vanilla Windows and finding all necessary drivers. I also get this method from internet and it is more tedious, but it gives you more control over the reset process.
For this method, you’ll need your Windows license key and installation media.
Once complete, you’ll also be free of any bloatware that may have plagued your computer in the past.
See Also: How To Adjust Your Screen Brightness.


🔶    Method 5:
1.      If you have recovery disc of your WINDOWS Insert the recovery disc into your CD drive and restart your computer then Recover Manager will eventually display on the screen
3.      Click the “System Recovery” link, then “Factory Reset”
4.      You will then be prompted to backup your files Follow the onscreen instructions to archive your files
5.      The HP factory reset process will start and may take a while to complete. Follow the onscreen instructions accordingly until you receive the “Restoration Complete” screen. Click “Finish”. Your computer will now restart and the Windows Setup Process will now be displayed.

➤➤  All the above Methods are very effective… Do try the above METHOD and also share your experience with us in comment section. Share this article with your friends and Subscribe my blog for more hacks...
See also: How To Turn Off Laptop Screen Manually

Sunday

How to Turn off Laptop screen manually | 7 software apps to manually turn off Notebook or Laptop LCD screen


If you are not using your laptop but decide to leave it on then the best option is to turn off laptop screen. Turning off screen save electricity, leave your laptop slightly cooler and increase your battery life. Many people think that you can only turn off screen in desktop PC and turning off laptop screen is not possible. But there are some software applications which allow you to turn off your laptop 💻 screen manually. Here learn how these software applications works and how you can use them to turn off your laptop screen.
See Also: How To Adjust Your Screen Brightness.
🔴      Turn Off LCD 
Turn off LCD is freeware software that simply turns off LCD of your monitor or laptop 💻. This program doesn't require any installation. Simply run the executable file whenever you want to turn off your screen. To on it just clicks any key from your keyboard or moves your finger on touchpad.
🔴      Monitor Off Utility 
Monitor off utility is a free program which allows you to turn off your screen by a single click. You can setup your own custom keyboard shortcuts in it. You can use it with multiple monitors and it is very flexible. You have to install this software.
🔴      MonitorES
MonitorES (Monitor Energy Saver) is very small application software with many built in features. It takes less memory and can be used in all windows version. You have to Press Ctrl + F2 or system lock screen keys "Window key + L" to turn off the screen.


🔴      Sleeper
Sleeper is also freeware software to turn off screen of your laptop and save your battery. Its file size is a bit larger. Click executable to turn off screen you can also set keyboard shortcuts.
See also: How to Take Screenshot In Window/Mac Laptop
🔴      ScreenOff
ScreenOff is freeware software that turn off your laptop 💻 screen without putting your system on sleep mode. Just download the zip file and extract its contents. Pin shortcut of screenoff.exe to your start screen or task-bar. Just click on icon whenever you want to turn off screen. You can also set keyboard shortcuts.
🔴      BlackTop
BlackTop is very handy tool. BlackTop turns your screen to power saver mode. Press Ctrl+Alt+B to turn off your screen. To turn it back ON touch on keypad.
🔴      NirCmd  
NirCmd is command line utility. It allows you to different tasks in your PC.     
          Download and extract files and then in folder click on NirCmd.exe and run it as administrator.
          Now in your desktop right click with mouse and then click New>> Shortcut.
          Click button of “Browse" and select NirCmd and press Ok or just Enter NirCmd in the box.
          Now click Next to Continue. Give shortcut a name such as Turn off screen or Screen off. 
          Click finish to create shortcut. You can also change icon of this shortcut.
You can also use other functions of NirCmd with same procedure.

➤➤   Do try the above Software Applications and also share your experience with us in comment section. Please let us know what works for you and what not —so that other readers can also benefit from your experience...Share this Article with your friends…And don't forget to Subscribe my blog...
See Also: How To Fix Laptop Audio Jack

Tuesday

How to boot from a CD/DVD or USB drive on any PC| Step-by-step free guide |


When you want to troubleshoot your PC or want to update the old version of your operating system. You can do these tasks by Booting your PC from CD or USB drive. Here is step by step guide on How to boot your PC from CD/DVD or USB drive.
See also: How to Fix IP Address conflict 
🔶    Insert a bootable CD or DVD into your disk drive. If you want to boot your PC from USB drive then attach your USB flash drive with your PC.
🔶    Reboot your PC.
🔶    Make sure your CD/USB drive is set as primary boot device.
🔶    When white screen or manufacturer's logo appears on screen press noted key to enter in Bios startup menu. Every manufacturer has different keys to access bios but mostly F12, F2, F10 and Del key is used to enter Bios. It appears under the manufacturer logo when PC starts.You can also search your manufacturer key on internet.


🔶    A new screen will appear as BIOS (Basic Input Output System). BIOS are set of instructions which control I/O operations in your PC. In Bios menu select Boot (Boot Order/ Boot Device).
🔶    In Boot menu highlight /select disk drive if you are using CD/DVD to boot and press Enter. But if you want to boot from USB drive choose USB-HDD instead of disk drive and press Enter. Use arrow keys to move the selected drive to top of the list.
🔶    Now save your changes and press Exit from menu.
🔶    Reboot your PC. Make sure CD/USB drive is in your PC. Now you are prompted to press any key to boot your PC from CD or USB. Press any key from the keyboard. 
🔶    Your PC will Boot into CD or USB instead of operating system.
🔶    Follow the On-screen instruction and do whatever you want to do.
Learn Also: How to Factory Reset PC
➤➤   Do try the above Method and also share your experience with us in comment section ...Share this Article with your friends…And Subscribe for more interesting articles...
See also: How To Activate Windows

Sunday

How to fix windows time | 5 best ways to fix randomly changing date and time of your windows


We often rely on our computers time 💻 ... But if your computer clock loses time or your pc time keeps changing randomly. This can be fatal. Here in this article learn simple tricks to fix randomly changing time of your pc.
See also: How To Activate Windows
🔴      Uninstall third party clock applications from your pc. Because these third party applications may influence your system time.
🔴      Check status of your windows time. 
➮   Click start and type "service.msc" in the search box and press Enter.
➮   Locate Windows TimeRight-click on it and select restart. This method sync your system time.

🔴      Replace CMOS chip in your pc. CMOS (Complementary Metal Oxide Semiconductor) chip is in your motherboard which stores information about system configuration. CMOS battery makes sure the chip can store data but if battery goes bad. Chip start losing information and no longer maintain its time and date. To fix this issue open the case of your pc and find which type of battery sits on your motherboard, go buy the new battery and exchange it.


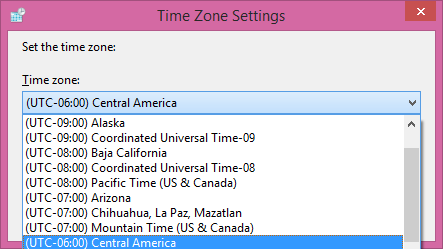
🔴      Right-click the system clock in your taskbar and select > Adjust date/time.Alternatively go to “change date and time settings”.  Check whether the Time zone information is correct.
 If not, click  > Change time zone button and in drop down menu select time zone and confirm your changes.
See also: How To Turn Off Laptop Screen Manually
🔴      Some time virus hijacks the system and messes with computer 💻 time. To fix it, install latest antivirus program in your computer. Also get a good malware scanner. for example Malwarebytes or Spybot Search & Destroy. 

➤➤  Do try the above tricks and also share your experience with us in comment section....Share this Article with your friends…And don't forget to Subscribe my blog for more hacks...
See Also: How To Adjust Your Screen Brightness.

Thursday

How to fix insufficient storage error in Android | 8 ways to fix insufficient storage available error in Android?


If you're sure that your phone has free storage but android don't allow you to install new apps or save photos or videos. Then obviously you have insufficient storage error in your phone. Which don't let your phone work properly?
Android users often face this error. Here are some advanced solutions to resolve insufficient storage error on your Android phone 📱 and tablets.
See also How to solve Phone Hang and Overheating issue in Smartphone.
  ➤ 8 ways to fix insufficient storage error in Android 
  1.   Fix error with hidden menu
Open your phone and dial *#9900#. This will open hidden menu of your phone. 
Select "Delete Dumpstate/logcat" from the menu and hit Ok button. This trick will fix the insufficient storage error.
  2.   Clear caches
Every website uses cache to increase the page speed. Whenever you visited a website you phone automatically store these cookies and caches. These unwanted caches decrease the available memory for apps and other files. You can clear these cookies and caches in your phone settings.
Go to setting>>Storage>>Click on the cache >> click on ok to clear caches.


  3.   Delete unnecessary media
Delete unnecessary media (photos, videos etc.) from your phone. You can increase your internal storage of phone by deleting these media files. If you don't want to delete them then move these files to External storage. You can also save your data on Google drive.
See also : Solutions To Fix Video Error On Android & iPhone
  4.   Minimize running apps
Minimize the number of concurrently running apps. Some apps run in background and we don't even know that they are running. Stop those apps that you don't need or uninstall apps you don't require. Forcibly stop background running apps. To see the list of currently running apps, go to Settings > Apps > Running App.
  5.   Move data to SD Card
Move apps and data from phone memory to SD card. Because external memory is larger than the internal memory and can also be easily expanded if required. Also make SD card your default write disk with this setting all your apps will install in SD card.
Go to Settings >Apps/ Storage > Default write disk > Select SD Card.

        If your SD card is damaged or corrupted you don't need to buy a new one you can fix it by yourself. ➜ How to Fix Corrupted/Damaged SD Card
  6.   Delete apps data
Whenever you download a file from internet it automatically save in download folder. Delete unnecessary photos, videos and other files from download folder.
If you are using Whatsapp, Viber, Skype or any other social media messenger app. Check the apps media also. Because when you sent or download any file from these apps then a copy of that file is automatically save there unless you off the media from the settings.
If you find any unnecessary files in these apps then delete these files to increase your phone storage.
Learn also >>> How To Fix Phone Headphone Jack
  7.   Restart phone
Some time unnecessary pieces of data linger on your phone and occupy memory space and cause insufficient. To solve this shutdown your phone every once in a while and then restart your phone. It will refresh the memory and solve the issue. To do this press phone's power button and then tap on power off. When it is power off completely then leave it for some time and then restart your phone by pressing/holding power button until android logo appear on screen. Restarting your phone will fix your software glitches and solve insufficient storage error.


  8.   Clear Junk files
Clear junk files from your 📱phone. To clean junk files download App Cache Cleaner. It is easy and simple to use just download it from App store. When it is installed in your phone open it and press huge Start button. This app will clear all caches, junk files and increase your phone 📱 storage space.
See also: How To Perform Factory Reset On Android
➤➤   Do try the above tricks and also share your experience with us in comment section. Please let us know what works for you and what not —so that other readers can also benefit from your experience...Share this Article with your friends…And don't forget to Subscribe my blog to get all the latest updates ...

Wednesday

How to fix iPhone white screen of death |Top 6 ways to fix iPhone, iPads, iPods white screen of death


White screen of death is very annoying problem which Iphone users mostly faces. It won't allow you to use your phone normally. Software bugs, update fall, low battery and hardware issue are the reason of this problem.
In this article I will tell you different ways to fix white screen of death in your Iphone 📱.  Learn also >>> How To Restore Apple ID
🔶    Three Fingers Trick
Double tap the screen by using three fingers. May be you accidentally turned on screen magnification and it is looking like white screen but it is not exactly the white screen issue. To fix screen magnification double tap the screen by three fingers together it will bring your screen back to normal.
See also How to solve Phone Hang and Overheating issue in Smartphone.
🔶        Force Restart
Press and hold Sleep/wake button and Home button of your phone at the same time. Until apple logo appear on screen. When logo appear let Iphone start up normally.
🔶        Remove Battery
Remove battery from your phone and put it back after some time. 
➧   To remove battery Power off your phone.
➧   Open screws at the bottom of your Iphone 📱.
➧   Gently lift the screen up.
➧   Open screws from the lower display and remove battery. If your phone needs a battery replacement then replaces it first. Then put it back in the phone.
See also : Solutions To Fix Video Error On Android iPhone


🔶    iTunes Recovery
➧   Recover your phone by iTunes.
➧   Connect your phone to a PC with USB cable.
➧   Open iTunes of your PC and in iTunes click on Restore Iphone. A dialogue box will appear on screen click on Restore.
➧   ITunes restore your phone back to normal. 
🔶        Hard Reset 
Press and hold Sleep/wake button, Home button and Volume up button at the same time. Release the button when white screen disappears. Now restart your phone.
🔶        Turn Off Auto Brightness
Turn off Auto brightness of your phone to avoid white screen of death. To turn off Go to settings >> Display & Brightness and turn Auto-brightness off.
➤➤       Do try the above tricks and also share your experience with us in comment section. If above tricks don’t works for you then connect your local Apple store for support...Share this Article with your friends…And Subscribe for more hacks... Learn also >>> How To Fix Phone Headphone Jack