Showing posts with label How_to_do. Show all posts

Friday

How to convert your Facebook page likes and followers into blog/website subscribers? | How to create a Facebook page | A complete guide


Facebook is convenient channel to share information, photos, videos and also a best platform to grow traffic of your blog. Facebook pages are best source to explode your blog. All you need to do is create an awesome Facebook page.
⇒⇒   My series of articles on Facebook …
 ⇲  How to create a Facebook page?
 ➩ To create a new Facebook page Sign in to your Facebook account and click on create page.
 ➩ Select which type of page you want to create Facebook give you two categories:
         1.  Business or brand (A page where you can Showcase your products and services, sell your products reach more customers, share your blog articles and interact with your followers on Facebook.)
         2.  Community or public figure ( A page where you can create a community and Connect with more people, organization, team, group or club.)
 ➩ Choose a category and click on get started.
 ➩ Now name your page and add a category to describe your page.You can also select brand name as your page name. Select page name according to your content. Unique page name attract more users.
 ➩ After that click on continue.
 ➩ Upload your page’s profile picture and cover photo.
 ➩ Your page is created now invite your friends to like your page. In
 ➩ Add a short description in page info section. This description tell people what this page is about.
 ➩ On your Facebook page You can;
           πŸ‘‰ Write status
           πŸ‘‰ Share your Photo & Videos
           πŸ‘‰ Advertise your business
           πŸ‘‰ Start Live Video 
           πŸ‘‰ Get Sign-ups
           πŸ‘‰ Get Messages
           πŸ‘‰ Create an Events
           πŸ‘‰ Create Offers
           πŸ‘‰ Write Notes
 ➩ You can also schedule your posts.
  πŸ‘€  How to add username in Facebook page?
 ➩ Add your page username in page info section. This username make easy for people to search you. You can change this user name at any time. 
           πŸ‘‰ To add username Go to About section > General > username  > Create page @username > choose a username.
           πŸ‘‰ After choosing user name click on Create username.
  How to convert your Facebook page likes & followers into blog/website subscribers? 
As I mention before Facebook pages are best source to explode your blog. You can share your blog articles on your Facebook page. Your Facebook followers are your permanent audience. You can turn your Facebook followers into your blog subscribers. I also get 70% of my blog traffic from Facebook…


  πŸ”Ά  To get subscribers directly from Facebook add a Facebook button. This Facebook button take your audience directly to your blog/website.
 ➩ To add button select which button you want your people to see among these five categories.
         1.  Make a booking with you (Book Now)
         2.  Contact you (Contact Us, Send Message, Sign Up, Get Quote, Send Email, Call now)
         3.  Learn more about your business (Watch Video, Learn more )
         4.  Shop with you or make a donation (Shop Now, See offers)
         5.  Download your app or play your game (Use App, Play game )
 ➩ After selecting category click on next.
 ➩ Now choose where you like this button send people here you can add your website/blog link. 
 ➩ And click finish. Button is successfully installed. You can test this button at any time. With this button you get subscribers directly from your Facebook page. 
  πŸ”Ά  Add your blog/ website link in your info section. This link would take your Facebook followers directly to your website and can increase your website/blog subscribers.
        πŸ‘‰ To add website/blog link Go to About section > Contact details  > Enter website.
           πŸ‘‰ After adding website link click on Save.
➧ You may also like : How to get Pinterest followers very fast
 ➤➤ Share this Article with your friends and write your queries and suggestions in comment section below …
Like my Facebook page to get cool stuff>>> @itHacks163
Wait!  Did you subscribe my blogπŸ˜•?
What are you waiting for subscribe my blog to get all latest updates directly to your inbox😎

Thursday

How to resize your design in canva for free | Magically resize your designs & social media graphics in canva


  What is Canva?
Canva is graphic design tool website. It is used by bloggers, entrepreneurs and business owners > both professional and non professionals. Best Part of canva is that it is easy to use. You can create best design in very short time... Canva provide verity of different templates & features which helps you to create an awesome design.
     ➧     If you are newbie then check my Step by Step Beginners Guide >>> How to use Canva.
Canva gives facility to create: 
  Social Media Post 
Twitter Post, Square Social Media Graphic, Pinterest Graphic, Facebook Post, Facebook App, Tumblr Graphic, Instagram Post  
  Documents
US Letter, Presentation, A4, Letterhead, Magazine Cover, Certificate, Resume, Yearbook
  Blogging & eBooks
Book Cover, Desktop Wallpaper, Wattpad Book Cover, Web Banner, Photo Collage, Blog Banner, CD Cover, Infographic
  Marketing Materials
Posters, Menu, Flyer, Logo, Brochure, Gift Certificate, Business Cards, Label
  Social media & Email headers
Facebook Event Cover, YouTube Thumbnail, Tumblr Banner, YouTube Channel Art, Twitter Header, Google+ Header, Etsy Shop Cover, Etsy Shop Icon, Email Header, Facebook Cover, Twitch Banner, Linkedin Banner, Soundcloud Banner
  Events
Postcard, Invitation, Card, Tag, Program, Announcement
  Ads
Facebook Ad, Wide Skyscraper Ad, Large Rectangle Ad, Leaderboard Ad.
   Canva provide size dimensions for all designs But You can also resize it according to your will.
⇲   How to resize your design in canva?


  πŸ”Ά   You can resize your design on canva home page. This resize is free
      To resize click on “Create a design” (Green button) located at left side.
      Click on "Use custom dimensions".
      Select Width & Height of your design after that select from given three types (px, mm, in).
      Click on Design to save your changes.
 Canva design window will open now create your design...
  πŸ”Ά   You can also resize your images in design window. Resize button helps you to directly resize your images after applying template and layout. Simply press resize button and adjust Width and Height of your design. 
But this resize button is only available in 30 days trial after that you have to buy it.
      Make your amazing designs with Canva and share your experience with us in comment section below. Also share which website you use to create your social media graphics —so that other readers can also benefit from your experience...
Share this Article with your friends… Wait!  Did you subscribe my blogπŸ˜•?
What are you waiting for subscribe my blog to get all latest updates directly to your inbox😎

Monday

How to schedule Instagram posts | Best Instagram Scheduler | The Ultimate Guide how I schedule my Instagram stories.


Instagram is rapidly growing internet based social media app.  You can promote your website and business on it. You can share photos and videos on it. Instagram is a mobile app available on smartphone (Android and iOS). You can open Instagram website on your PC but this website don’t allow you to upload photos and videos. But as a website or business owner we mostly save our work on PC and it is difficult and time consuming task to first share those pictures to your phone and then upload them to your Instagram mobile app.
But don’t worryπŸ˜‰ there are some software applications available which allow you to use Instagram with full features (Including uploading and scheduling photos and videos) on PC.
➤➤  How to schedule Instagram posts
Instagram stories drive traffic to your blog and website. Scheduling your stories also save time and effort. Here is a list of apps which allow you schedule your Instagram stories.
⇲ Best Instagram Scheduler ⇲
       Deskgram
       LR/Instagram 
       Hootsuite
       BlueStacks
       Push.Photo
       Andyroid
       Uplet
       Gramblr


➤ How I schedule my Instagram stories.
There are many apps which allow you to schedule Instagram stories but I use Gramblr. Gramblr is originally a desktop application that allows you to upload photos and videos on Instagram. Best part of Gramblr is that it is free. I’m using it from one year and did not spend a tiny amount on it …Isn’t it awesome?
You can schedule 100 of your stories on it.
πŸ”Ά   Firstly Download and Install it. When installation is complete then run as administrator … In starting window you can sign up but if you already have an account then login with your email and password.
πŸ”Ά   In Gramblr home your account appears at right side. You can switch account, visit your profile or sign out from there.
πŸ”Ά   To upload and schedule your story click on Upload now . After that click on select your media ... Drag and drop your image or video from PC folder.
πŸ”Ά   After that crop your image according to your choice and click on save.
πŸ”Ά   You can apply filters and motions on your image. Gramblr photo editor tools allow you to make changes in your image…. After applying these tools click on save and continue.


πŸ”Ά   Last step is writing a caption and send. In this step caption your post include detail of your post also add related hashtags. You can upload your post immediately or you can choose some other time to schedule your post ... select perfect date from calendar and perfect time for your post. You can also tag any user by clicking on image and then click on send.
πŸ”Ά   Your all scheduled posts appear on schedule section. You can edit that setting at any time... Use Gramblr freely...
  You may also like > How to use Instagram on PC.
 ⏩    Do try the above Applications and also share your experience with us. Please let us know which website or app you use to schedule your stories works  —so that other readers can also benefit from your experience...
Also follow me on instagram @it_hacks163
Share this Article with your friends…And don't forget to subscribe my blog to get all latest updates directly to your inbox...

Thursday

How to get Pinterest followers very fast >>> Best ways to increase followers & drive traffic to your blog


As blogger you must agree with me that blog/website promotion is full time job. We use different methods to increase over traffic... To promote over website/blog we join different social media platforms like Facebook, Linkedin, Pinterest, Tumblr, Twitter,  Instagram etc...But I personally like Pinterest because Pinterest is best platform for blog promotion and it gives high CTR of ads ...More ad clicks mean more money... isn't it amazing?
Pintetrest followers are your permanent audience and in this article learn some best tips on
➤➤  How to get Pinterest followers very fast
πŸ”Ά   There are lot of people on Pinterest with different ideas and niches. Search people of your niche in Pinterest search bar and Follow them. Because when you follow someone other person get notification and mostly people like to follow people of same niches.


πŸ”Ά   Follow people on Pinterest who have lot of followers because if they follow you back then their followers also follow you … so through this your followers will increase.
πŸ”Ά   Create a vertical and attractive pin. While uploading pins add your post URL and description of your website post in it. Also use related hash tags. I suggest use Pinterest keywords in your pin description. Use large pins because large pins attract more people.
πŸ”Ά   Follow for follow is also best technique to increase followers. There are many Facebook groups which create thread of folllow for follow ...to join these threads join different Facebook groups. These facebook groups are traffic booster through these groups you get to know more people.
πŸ”Ά   Convert your Pinterest account to a business account... Business account is quick, easy and free. It gives you facility of Pinterest analytics which help to track all your pins activity and monitor Pinterest profile. Business account helps you reach more followers.
πŸ”Ά   Your Pinterest boards give you followers. Create different boards on Pinterest and save your pins in it. Use Pinterest keywords as your board name. These boards are permanent so if you use common words as board name then they always come in search. 
πŸ”Ά   To increase your followers it is recommended that not only create your own boards but also contribute in other group boards. When you pin in any group board other members see your content and if they like it then follows you. As a beginner because you have few followers so join those group boards which have more followers. Check my list of
πŸ”Ά   Repin other peoples content. This method can rank you higher on Pinterest and increase your followers.
πŸ”Ά   Create quotes pins. Mostly people like quotes and memes and repin them as well. So these are source of followers.
πŸ”Ά   Tailwind tribes also increase your followers. Tailwind tribes are groups of bloggers and business owners who exchange their stuff in it. Joining tailwind help you schedule your posts and also grow your followers fast…
πŸ”Ά   There are many websites on internet which give followers with money… but personally I don’t get the idea of these blind followers … well I’m using blind term for these followers because these are fake accounts which only increase the number of your followers but you can’t able to achieve the main goal >>> Number is not everything the main goal of Pinterest followers is to get website traffic and earn money… you can’t able to achieve this goal with fake accounts but still choice is yours…


If you are newbie then check my article
You surely find it helpful...
➤➤       I also have Pinterest group board open for contribution.  If you are interested then follow my Pinterest
>>>  iT-HaCks | Best Of Hacks| Blogging Tips| love Blogging
and send me message on it…Share this Article with your friends…And I have a plan of writing more articles on Pinterest so subscribe my blog to never miss a single update. Also if you have any query related article then write us in comment section below.

Saturday

How to pass an exam - Simple study tips. tricks and best guideline for success


Hurray! Exam season
I know it’s not a situation in which I have to say hurray because it is very tense situation for many students like me. For the record I’m also student and I think I’m quite brilliant student (this is my opinion if teachers and instructors don’t agree with this then that’s their problemπŸ˜‰ ).
Wondering how invented this examination system …I really want to give him/her a high five … on face😈.
Well students who are suffering from exam fever … why fever when I’m here😜 …
 I decided to write an article on best guidelines to pass exams … sound interesting😡?
.         Do not panic: Many students panic during exam and then even can’t able to attempt easy questions and that is the main cause of failure. Firstly attempt easy questions and after that take a deep breath and try to solve the difficult ones.
.         Give detailed answers: Use as much extra sheets as you can … I know to the point answers are good but detailed answers are best when you want to explain something …because it became easier for examiner to understand what are you talking about. Specially detailed answers help a lot when you do not know to the point answer...if you can't answer them at least confuse them…
.         Do not skip any question: Many students skip lengthy questions and leave questions unwritten. I think that is bad habit … because that affects your grades. If you do not know the answer still tries to attempt it. But I repeat don’t leave any single question.
.         Revision: Wake up early. 04:00 Am sharp .early morning revision is best because you read with fresh mind. Also perform prayer. (dwa & dua )
.         Reach examination hall on time.


.         Read whole paper carefully before attempting.
.         Create Notes: Many student read whole book for preparation but I think short notes are best. Because during exam you don’t have enough time to read whole book so making notes is good habit.
→ These are few guidelines for exam … Share this article with your friends and also if you have any secret to pass exam feel free to share in comment section below.
Good luck with your exams.

Friday

How to place Adsense ads middle or anywhere inside blogger posts


Google AdSense is best option to earn money πŸ’°. You can easily create an account on AdSense and associate that account with your website.
See also: How to Sign Up on AdSense
 With this simple way you can turn your passion into money by placing ads on your website. But Location of ads in your website/blog is also matters a lot. Placing your ads in middle of your post give high CTR. But placing ads middle of your post is little tricky. In this article learn how to place ads in middle of your blog/ website post.
Also I suggest to use Propeller ads with adsense to increase your payments.Here Sign up for PropellerAds you'll get quick approval. 
πŸ”Ά      Go to Google AdSense and Sign in to your account which is associated with your blog/website.
πŸ”Ά      At Adsense home page open menu from the left and click "My ads" >> "content" and click "Ad units" from dropdown menu.
πŸ”Ά      In ad units all ads are available which are currently active in your blog/website . Select one ad which is suitable to place in middle of your post.. I think ads of 336x280 size are best. 
After selecting your desired ad click on get code. And copy code from there. You can also create ads of your choice by clicking on "new ad unit"


πŸ”Ά      Open notepad in your PC and paste the Adsense code in it. Add
<center><div style="width:50%";margin:0px auto;">  before Adsense code. And    </div></center>  After the Adsense code. 
πŸ”Ά      Now copy the whole code. And you have to paste it in HTML section of your blog/website post.
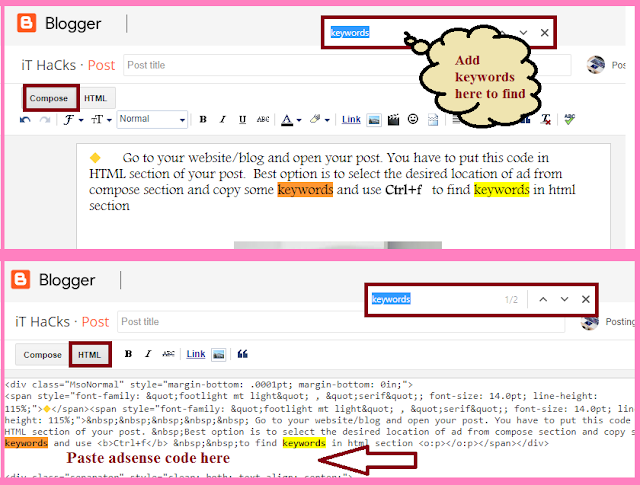
πŸ”Ά      Go to your website/blog and open your post. Best option is to select the desired location of ad from compose section and copy some keywords and use "Ctrl+f"  to find keywords in html section
πŸ”Ά      Now copy Adsense code from notepad and paste it in HTML section.
πŸ”Ά      Click preview and see your ads. Congratulation your AD placement is done. Publish your post and enjoy High CTR.


➤➤  If you find this article beneficent then Share this Article with your friends…And don't forget to Subscribe my blog for more hacks...if this method is not working or you are facing any difficulty write us in comment section below.